
Renaming your Network Profile Name
Some time ago I wanted to change the name of my network, and searching here and there I found a post here that pointed in the right direction.
I wrote the steps I did there, but I wanted to also add to my site 😋.
How to rename your Network Profile Name
Every time you connect to a new network Windows create a profile for it, giving it a unique name. In wireless networks this is accomplished by using the network SSID. However for wired networks it is usually a variation of "Network".
There are two options to do so:
Rename it in the Registry; or
Rename it in the Local Security Policy
Renaming it in the Registry
Here are the steps to do so:
Open the Registry Editor
Press Win+R and type "regedit" and click OK (or press Enter); or
Press the Windows key and type "reg" to search for the app and click its icon to open it.
If you're prompted by the USA, click "Yes".
Navigate, on the left panel, to the following key:
HKLM\SOFTWARE\Microsoft\Windows NT\CurrentVersion\NetworkList\ProfilesIf you connect to various networks you'll find a list of GUIDs under this key.
Browse each of them until you find the one you want to rename. You'll know you found because of the property "ProfileName" will be the one you're looking for.
Edit the profile name. You can do this through two ways:
Double click the "ProfileName" property; or
Right click it and choose Modify.
Type in the new name and click OK (or press Enter).
Close the Registry Editor.
Done! 😀
Renaming it in the Local Security Policy
NOTE:
The *Local Security Policy Editor* is only available
in the Windows Pro and Enterprise versions.
Also, this will rewrite the option above.
Here are the steps to do so:
Open the Local Security Policy Editor Editor
Press Win+R and type "secpol.msc" and click OK (or press Enter); or
Press the Windows key and type "secpol" to search for the app and click its icon to open it.
If you're prompted by the USA, click "Yes".
Navigate, on the left panel, to Network List Manager Policies.
On the right panel you'll see all the networks you're currently connected.
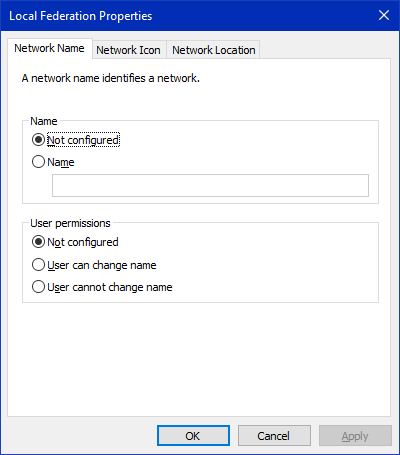
Select the network you want to rename and edit its properties. You can do this through to ways:
Double click the profile name; or
Right click it and choose "Properties"
A screen similar to this one should appear:
-
In the field Name type the name you desire and click OK (or press Enter)
The name you put in this field is, also, stored in the Registry in the property "NetworkName" under the following key:
HKLM\SOFTWARE\Policies\Microsoft\Windows NT\CurrentVersion\NetworkList\Signatures\unique_identifier Close the Local Security Policy Editor.
Log off and log back on the network,
Done! 😀
Comments
Post a Comment